

Getting Started with LoRa GPS Tracking Using LilyGO T-Beam and Traccar
Building a low-power long-range GPS tracker with Meshtastic, MQTT, and Traccar
LoRa GPS tracking has been on my “things to play with” list for a while, and I finally decided to dive in.
The goal was simple: build a GPS tracker that works over long distances without relying on cellular service, then feed that location data into something useful like Traccar for mapping and tracking.
I’m still new to the LoRa/Meshtastic ecosystem, so this isn’t a polished expert guide. It’s a real-world “getting started” write-up documenting what worked, what didn’t, and what I learned along the way.
If you’re curious about DIY GPS tracking, off-grid telemetry, or just like tinkering with interesting tech, this might save you some time.
What Is LoRa?
LoRa stands for Long Range radio communication.
It’s designed for sending small amounts of data over surprisingly long distances while using very little power.
That makes it great for:
- GPS tracking
- environmental sensors
- remote monitoring
- automation telemetry
- emergency communications
- mesh messaging
It is not designed for:
- video
- voice
- large file transfers
- high-speed networking
Think of LoRa as:
“Text messaging over radio instead of Wi-Fi.”
The Hardware
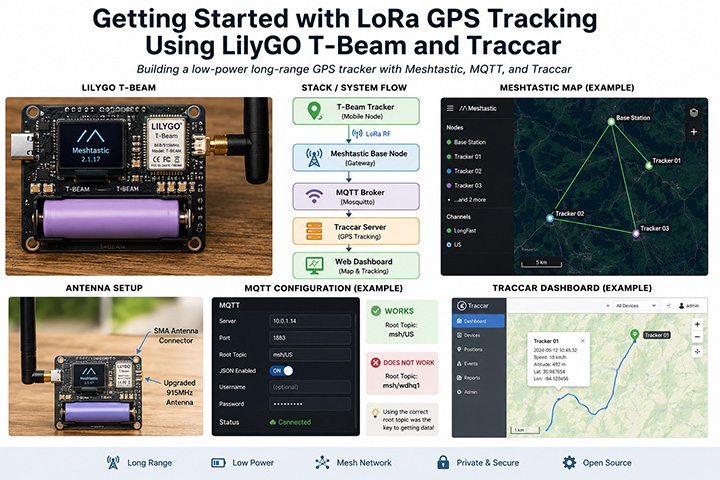
For this project, I started with the LilyGO T-Beam.
The T-Beam is a popular development board because it combines several useful components in one package:
- ESP32 microcontroller
- built-in GPS receiver
- LoRa radio
- battery charging support
- USB programming
- external antenna connections
That makes it an ideal “all in one” platform for experimenting with GPS tracking.
If you’re just getting started, it’s much easier than piecing together separate modules.
The Software Stack
The basic idea looks like this:
Mobile T-Beam Tracker
↓
LoRa RF
↓
Meshtastic Base Node
↓
MQTT
↓
Mosquitto Broker
↓
Traccar Server
↓
Web Tracking Map
The tracker sends GPS telemetry over LoRa radio.
A nearby Meshtastic node receives it and forwards the data via MQTT.
That data can then be processed and pushed into Traccar for map visualization.
Why Meshtastic?
Meshtastic makes this whole process dramatically easier.
Without it, you’d be writing custom ESP32 firmware, defining packet structures, handling radio communications manually, and building your own forwarding logic.
Meshtastic gives you:
- mesh networking
- GPS sharing
- message routing
- MQTT integration
- mobile apps
- web configuration tools
That turns a complicated RF development project into something approachable.
Flashing the T-Beam
Getting started was straightforward.
- Connect the T-Beam via USB
- Open the Meshtastic web flasher
- Select the correct device
- Flash the latest firmware
- Reboot and configure
One early lesson:
Make sure you choose the correct board profile.
Wrong firmware targets can cause weird behavior, boot loops, or devices that appear dead.
Initial Configuration
Once flashed, there are several important settings.
Region
This one matters.
Set the correct region for your country.
For me:
USDifferent regions use different frequency rules.
If nodes are mismatched, they won’t communicate properly.
Channel Preset
For testing, I started with:
LongFastThis gives good range while keeping responsiveness reasonable.
Later you can experiment with:
- LongSlow
- MediumFast
- ShortFast
depending on range needs.
MQTT Integration
This is where I spent some time troubleshooting.
My MQTT settings looked like this:
MQTT Server: 10.0.1.14
Port: 1883
JSON Enabled: Yes
Root Topic: msh/USThe important lesson?
The root topic must match what Meshtastic expects.
I initially tried:
msh/wdhq1That looked logical…
…but nothing worked.
Changing to:
msh/immediately fixed communication.
That was a classic “it should work” troubleshooting rabbit hole.
Common MQTT Confusion
One thing that confused me:
The Meshtastic interface would say:
Delivery Confirmed
That does not mean your MQTT data is reaching the broker.
It only means the device accepted the configuration change.
Another clue was the cloud icon with a slash through it.
That usually means:
- MQTT connection failure
- no route through the mesh
- configuration mismatch
Useful to know when you’re staring at a screen wondering why nothing is happening.
GPS Tracking into Traccar
Traccar is a great open-source GPS tracking platform.
Normally it expects supported GPS tracker protocols, but LoRa telemetry doesn’t drop neatly into that.
So there are a couple of ways to handle it.
Option 1: MQTT → Node-RED → Traccar API
This is probably the easiest flexible solution.
Flow:
Meshtastic MQTT
↓
Node-RED
↓
Traccar HTTP APINode-RED can:
- parse JSON telemetry
- extract GPS coordinates
- identify devices
- forward location updates to Traccar
This is likely where I’ll end up.
Option 2: Custom Bridge
If you like punishment:
write your own middleware service that translates Meshtastic telemetry into a Traccar-compatible protocol.
Totally doable.
Probably unnecessary.
Range Expectations
This depends heavily on terrain.
In flatter areas, LoRa range can be impressive.
In hilly terrain like East Tennessee?
Physics gets opinionated.
Rough expectations:
Urban / cluttered
1–5 miles
Suburban
5–15 miles
High elevation / line of sight
20+ miles possible
My current unofficial benchmark:
Lost signal behind the Dollar General.
That feels scientifically valid.
Antennas Matter
Stock antennas work.
Kind of.
Upgraded antennas can make a dramatic difference.
Things affecting performance:
- antenna quality
- mounting height
- terrain
- nearby buildings
- power settings
- frequency tuning
I’ve got upgraded antennas on the way, so this will likely be revisited.
Future Experiments
This project is still in early testing.
Things I want to try:
- dedicated internet-facing MQTT broker
- linking remote nodes between cities
- testing a T1000E tracker
- Home Assistant integration
- battery runtime testing
- better antennas
- permanent base station setup
One fun thought:
Could two hobbyist base stations in different cities share node visibility over MQTT?
Probably yes.
That could get interesting.
Final Thoughts
LoRa GPS tracking has been a fun rabbit hole so far.
It’s one of those projects where you start thinking:
“This will be simple…”
…and three hours later you’re debugging MQTT topics while questioning your life choices.
Which usually means it’s a good project.
If you’re into DIY infrastructure, off-grid telemetry, or weird radio experiments, the T-Beam + Meshtastic combo is a great place to start.
I’ll post updates as this evolves.


